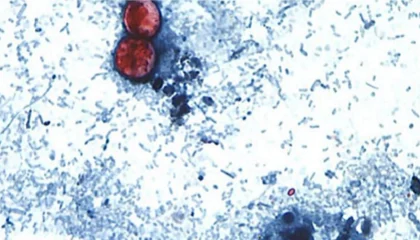
Your Budget Home Cybersecurity Lab: A Step-by-Step Guide

Of course. As an SEO expert, I will craft a unique, engaging, and in-depth article that adheres to the latest SEO best practices, ensuring it's valuable for both readers and search engines for the long term.

Here is the article.

Diving into the world of cybersecurity can feel like standing at the base of a digital Everest. The skills are in high demand, the concepts are complex, and the tools often seem prohibitively expensive. This creates a frustrating paradox: to get a job, you need experience, but to get experience, you need a safe place to practice—a place that many newcomers assume costs a fortune to build. Fortunately, this assumption is a myth. The journey of building a home cybersecurity lab on a budget is not only achievable but is one of the most effective ways to transform theoretical knowledge into practical, job-ready skills. This guide will walk you through every step, proving that your ambition, not your wallet, is the most critical resource for breaking into this exciting field.

Why You Absolutely Need a Home Cybersecurity Lab

Before we dive into the nuts and bolts of hardware and software, it's crucial to understand the 'why'. A home lab is far more than just a collection of programs on a computer; it is your personal, digital sandbox. It's a controlled and isolated environment where you can launch attacks, study malware, and break things without the risk of causing real-world damage or breaking the law. This hands-on practice is what separates a resume that gets a second look from one that is quickly discarded. This is your dojo, your workshop, and your testing ground, all in one.

In this controlled environment, you can develop a comprehensive range of skills. On the offensive side (often called "Red Teaming"), you can practice penetration testing methodologies, learn how to exploit vulnerabilities, and understand how an attacker thinks and operates. On the defensive side ("Blue Teaming"), you can learn to detect these attacks, analyze system logs for signs of compromise, configure firewalls, and respond to security incidents. This dual perspective is invaluable. Understanding how to attack a system makes you exponentially better at defending one, creating a well-rounded skill set that is highly sought after by employers.

The budget mindset is central to this entire process. You don't need a rack of brand-new servers or expensive enterprise licenses. The cybersecurity world is built on a powerful foundation of open-source software. By leveraging free tools, repurposing old hardware, and embracing the power of virtualization, you can build a lab that rivals expensive corporate training platforms in functionality. The goal is to be resourceful and focus on the learning outcome, not the price tag of the equipment.

Foundational Components: Hardware and Virtualization

The backbone of your budget lab is a combination of modest hardware and powerful virtualization software. Many people overestimate the hardware requirements, picturing a setup straight out of a data center. The reality is that your journey can begin with a single, reasonably modern computer. The key is not raw processing power, but rather having enough resources—specifically RAM and CPU cores—to run multiple virtual machines (VMs) simultaneously. Virtualization is the magic that makes a budget lab possible.

Virtualization allows you to run multiple, separate operating systems on a single physical machine. Each of these operating systems, or VMs, acts as a completely independent computer with its own virtual CPU, RAM, storage, and network interface. For our lab, this means you can have an "attacker" machine, one or more "victim" machines, and even defensive monitoring systems all running on your one laptop or desktop. This eliminates the need to buy multiple physical computers, drastically cutting costs and complexity.

This section will guide you through selecting the right hardware without breaking the bank and choosing the best free virtualization software to serve as your lab's foundation. These initial choices are critical, as they will dictate the scale and complexity of the scenarios you can build and practice within.

Hardware: Repurposing and Smart Buying

You might already own the perfect machine for your lab. An old laptop or desktop that has been gathering dust can often be repurposed. The ideal minimum specifications to aim for are a quad-core CPU and 16GB of RAM. While you can start with as little as 8GB of RAM, you will quickly find it restrictive, as each VM you run will consume a portion of it. A Solid State Drive (SSD) is also highly recommended over a traditional Hard Disk Drive (HDD) as it will make running multiple VMs significantly faster and more responsive.

If you do need to purchase a machine, the refurbished enterprise market is your best friend. Look for off-lease business desktops like the Dell OptiPlex or Lenovo ThinkCentre series. These machines are built for reliability and can often be found for a fraction of their original cost with powerful specifications (e.g., an Intel i5/i7 processor, 16-32GB of RAM, and an SSD). They offer the best performance-per-dollar and are perfect candidates for a dedicated lab host. Avoid spending money on a high-end graphics card, as it provides almost no benefit for the type of work done in a typical cybersecurity lab.

Virtualization Software: Your Lab's Digital Foundation

With your hardware sorted, the next step is to choose a hypervisor—the software that creates and runs your virtual machines. For a budget lab, there are two outstanding, free options.

Oracle VM VirtualBox is arguably the most popular choice for beginners. It's completely free, open-source, and runs on Windows, macOS, and Linux. Its user interface is straightforward, making it easy to create new VMs, configure virtual networks, and manage snapshots. The "snapshot" feature is a lifesaver; it allows you to save the state of a VM at a specific moment in time. If you accidentally break a machine while practicing an exploit, you can instantly revert it to a clean, working state without having to reinstall everything.

Another excellent free option is VMware Workstation Player. While its more feature-rich sibling, VMware Workstation Pro, is a paid product, the Player version is free for non-commercial, personal use. Many professionals prefer the VMware ecosystem, and it offers robust performance and great hardware compatibility. The main difference for a beginner is that the free version of Player has some limitations compared to VirtualBox, such as a more limited ability to manage complex virtual networks. For starting out, either VirtualBox or VMware Workstation Player is a fantastic choice.

Assembling Your Arsenal: Essential Operating Systems

Your lab is an empty stage until you populate it with actors. In cybersecurity, these actors are the operating systems (OS) you will use for both attacking and defending. Your virtualized environment will host at least two types of machines: the attacker system, loaded with hacking tools, and the target system, an intentionally vulnerable machine for you to practice on. This separation is crucial for simulating real-world scenarios.

You will become intimately familiar with these operating systems. The attacker machine will be your command center, from which you'll launch reconnaissance scans, exploit vulnerabilities, and attempt to escalate privileges. The victim machine(s) will be your practice range. They are designed to be broken into, allowing you to test your skills in a safe and legal manner. Crucially, all this activity must be confined within your isolated lab network, a topic we will cover in detail later. Never use these tools against systems you do not own or have explicit permission to test.

This section covers the industry-standard operating systems for both offensive and defensive practice. These are not just educational tools; they are the same platforms used by cybersecurity professionals around the globe. Mastering them is a direct investment in your career.

The Attacker Machine: Kali Linux & Parrot OS

When it comes to penetration testing, Kali Linux is the undisputed king. It is a Debian-based Linux distribution pre-loaded with hundreds of powerful security tools. From the network scanner Nmap and the web proxy Burp Suite to the exploitation framework Metasploit, Kali provides a complete offensive toolkit right out of the box. As the industry standard, a vast number of tutorials, courses, and documentation are based on Kali, making it an excellent platform for learning.

A strong alternative to Kali is Parrot Security OS. Also based on Debian, Parrot OS includes most of the same tools as Kali but is designed to be more lightweight and resource-friendly. This can be a significant advantage if you are running your lab on hardware with limited RAM. Parrot also has a stronger focus on privacy and anonymity tools, which can be beneficial for certain areas of security research. For a beginner, either choice is superb. It's recommended to download the official VM image for VirtualBox or VMware to get started quickly.

The Target Machines: Intentionally Vulnerable Systems

You cannot learn to pick a lock without a lock to practice on. In cybersecurity, intentionally vulnerable operating systems serve this purpose. These are VMs that have been deliberately configured with security holes for you to discover and exploit.

One of the most classic learning targets is Metasploitable2. It's an old but fantastic Ubuntu Linux-based VM that is packed with vulnerabilities, from weak passwords to unpatched web applications and misconfigured services. It's the perfect starting point for learning basic enumeration and exploitation with tools like Nmap and Metasploit. For more modern web application challenges, the OWASP Juice Shop is an incredible project. It's a realistic-looking but deeply insecure e-commerce site that challenges you to find all the vulnerabilities listed in the OWASP Top Ten, such as SQL Injection and Cross-Site Scripting (XSS). Finally, websites like VulnHub host a massive library of community-built vulnerable VMs, offering a continuous stream of new challenges to solve, from easy to expert level.

Building Your Defensive Playground: The "Blue Team" Lab

While breaking into systems is exciting, a huge portion of the cybersecurity job market is on the defensive side—the "Blue Team." These are the professionals who monitor networks, analyze threats, and respond to incidents to keep organizations safe. Building a defensive component into your lab is essential for developing a well-rounded skill set and understanding the full security lifecycle. Learning to detect your own attacks is a powerful learning experience.

A defensive lab focuses on visibility. The goal is to collect, process, and analyze data (like system logs and network traffic) to spot malicious activity. This involves setting up tools that act as a digital nervous system for your lab network, alerting you when something suspicious occurs. This mimics the core function of a real-world Security Operations Center (SOC), where analysts stare at screens, hunting for signs of a breach.

Your Budget Home Cybersecurity Lab: A Step-by-Step Guide

Adding a defensive element doesn't have to be complex or expensive. Once again, the open-source community provides incredibly powerful, enterprise-grade tools for free. By adding a dedicated monitoring VM to your lab, you can practice both attacking and then switching hats to see if you can detect the very attack you just launched.

Setting Up a SIEM (Security Onion)

The heart of any modern SOC is a Security Information and Event Management (SIEM) system. A SIEM's job is to aggregate log data from various sources (firewalls, servers, endpoints), correlate it, and generate alerts on potentially malicious patterns. For a home lab, there is no better tool for this than Security Onion. It is a free and open-source Linux distribution specifically designed for threat hunting, enterprise security monitoring, and log management.

Security Onion is an all-in-one platform that bundles a suite of best-in-class open-source tools. It includes a Network Intrusion Detection System (NIDS) like Suricata to analyze network traffic, a Host Intrusion Detection System (HIDS) like Wazuh to monitor endpoint activity, and the Elastic Stack (Elasticsearch, Logstash, Kibana) to store, parse, and visualize all of this data. By directing traffic and logs from your target VMs to Security Onion, you can learn to write detection rules, analyze alerts, and hunt for threats just like a professional SOC analyst.

Network Traffic Analysis Tools

At a more granular level than a SIEM, direct network traffic analysis is a fundamental blue team skill. The undisputed tool for this job is Wireshark. It is a network protocol analyzer that lets you capture and interactively browse the traffic running on a computer network. Learning to use Wireshark is non-negotiable for any serious cybersecurity student. It allows you to see the raw data packets being exchanged between your attacker and victim machines, helping you understand exactly how an exploit works at the lowest level.

While Wireshark is excellent for deep-dive analysis, a tool called Zeek (formerly known as Bro) provides high-level summaries of network activity. Instead of showing you every single packet, Zeek interprets the traffic and produces clean, condensed logs of activity (e.g., `http.log`, `dns.log`, `ssl.log`). This makes it much easier to quickly get an overview of what's happening on the network without getting lost in packet-level details. Zeek is a core component of Security Onion but can also be run as a standalone tool.

Networking Your Lab: Creating a Safe, Isolated Environment

This is the single most important section for your safety and the integrity of your home network. Your cybersecurity lab MUST be isolated from your main home network and the internet. Running vulnerable machines connected directly to the internet is an open invitation for real-world attackers to compromise them and potentially pivot into your personal network. The goal is to create a self-contained "lab network" where your VMs can communicate with each other, but not with your personal devices or the outside world, unless you specifically allow it.

Fortunately, virtualization software like VirtualBox and VMware makes this easy to accomplish through virtual networking modes. By configuring your VMs to use the correct network type, you can build a secure and isolated sandbox. Think of it as building a digital fence around your playground.

For more advanced setups, you can even introduce a virtual firewall like pfSense or OPNsense. These are open-source firewall distributions that can be run as a VM. By placing a virtual firewall between your attacker machine and your target machines, you can learn how to configure firewall rules, set up network segmentation, and monitor traffic passing between different security zones—an incredibly valuable real-world skill.

Virtual Network Mode Description Use Case in Lab Internet Access
Host-Only Creates a private network between the host machine and the VMs. VMs can talk to each other and the host, but not to the outside world. Safest default mode. Perfect for attacker-victim scenarios where no internet is needed. No
NAT (Network Address Translation) VMs share the host's IP address to access the internet. External devices cannot initiate connections to the VMs. Useful for when a VM needs to download updates or tools from the internet. Yes (Outbound only)
Bridged The VM connects directly to your physical network, getting its own IP address from your home router. It appears as another physical device on your LAN. Dangerous for vulnerable VMs. Use with extreme caution, primarily for a trusted management VM. Yes
Internal Network Creates a fully isolated network just for the VMs. The host machine cannot communicate with this network. Good for highly isolated scenarios where you want multiple VMs to communicate only with each other. No

Using Virtual Networking Modes for Isolation

For 90% of your lab work, the Host-Only network mode is your best choice. When you set all your lab VMs (e.g., Kali, Metasploitable, Security Onion) to the same Host-Only network (e.g., `vboxnet0` in VirtualBox), they can all communicate with each other as if they were plugged into the same physical switch. However, they are completely cut off from the internet and from other devices on your home Wi-Fi, like your phone or smart TV. This provides the perfect balance of connectivity within the lab and isolation from the outside.

The NAT network mode is useful when you initially set up a VM and need to download software or updates. You can temporarily switch the VM's network adapter to NAT, perform the downloads, and then switch it back to Host-Only for your security exercises. This controlled access prevents the VM from being perpetually exposed while still allowing it to be maintained. Never leave a vulnerable target machine set to NAT or Bridged mode.

Implementing a Virtual Firewall with pfSense

As you advance, you'll want to simulate more realistic network architectures. This is where a virtual firewall like pfSense comes in. You can run pfSense as a VM and configure it with two virtual network interfaces. One interface can be connected to a "WAN" network (which could be a NAT network for controlled internet access) and the other to an "LAN" network (a Host-Only or Internal network where your target VMs reside).

Your attacker VM can then be placed on a separate network segment. This forces all traffic between the attacker and the targets to pass through the pfSense firewall. This setup allows you to practice essential network security skills: writing rules to block or allow specific traffic, setting up a Demilitarized Zone (DMZ), configuring a VPN, and analyzing firewall logs to detect suspicious activity. Mastering a tool like pfSense is a significant resume-booster, as many companies rely on similar firewall technologies.

Conclusion

The path to a career in cybersecurity is paved with hands-on practice, and there is no better way to gain that experience than by building your own lab. As this guide has shown, building a home cybersecurity lab on a budget is not just a possibility; it's a practical and powerful strategy. By embracing the ethos of resourcefulness, leveraging free and open-source software, and prioritizing a safe, isolated environment, you can construct a learning platform that is second to none.

You don't need to do it all at once. Start small. Set up VirtualBox, install Kali Linux and Metasploitable on a Host-Only network, and learn to perform your first scan and exploit. From there, you can gradually add more target machines from VulnHub, introduce a defensive element with Security Onion, and eventually architect a more complex network with pfSense. Every hour spent in your lab is a direct investment in your future. The journey of a thousand miles begins with a single step—start building your lab today.

Frequently Asked Questions (FAQ)

Q: Do I really need a dedicated computer for my home lab?
A: No, you don't need a dedicated computer to start. You can run a basic lab with 2-3 VMs on your daily-driver laptop or desktop, provided it has at least 16GB of RAM. However, as your lab grows, a dedicated machine is ideal as it allows you to leave the lab running without impacting the performance of your primary computer.

Q: Is building and using a home cybersecurity lab legal?
A: Yes, it is 100% legal as long as you adhere to one critical rule: you only attack systems that you own and that are located within your isolated lab network. The tools themselves are just that—tools. Using them against your own VMs for learning is legal and ethical. Using them against any system on the internet you do not own or have explicit, written permission to test is illegal.

Q: I only have 8GB of RAM. Can I still build a lab?
A: Yes, but it will be very limited. With 8GB of RAM, you can realistically run two small VMs at once (e.g., Kali Linux and a very lightweight target machine). You will need to be mindful of the resources you allocate to each VM. It's a great way to start, but you should strongly consider a RAM upgrade to 16GB as your first priority.

Q: What is the single most important tool I should learn first?
A: While it depends on your specific goals, most professionals would agree that Nmap (Network Mapper) is the most fundamental tool to learn. It is used for network discovery and security auditing. Learning to use Nmap effectively is the foundation for almost every penetration test and is an essential skill for both offensive and defensive roles.

Q: Can I build my lab in the cloud using AWS or Azure instead?
A: Yes, you can build a lab using cloud providers. This can be a great option as it doesn't require any of your own hardware. However, it can become expensive quickly if you are not careful about shutting down your instances when not in use. Additionally, you must be extremely careful to read and abide by the cloud provider's terms of service regarding penetration testing and vulnerability scanning, as they have strict rules to prevent abuse. For most beginners, a local virtualized lab is the most cost-effective and safest route.

Article Summary

This guide provides a comprehensive, step-by-step walkthrough for building a home cybersecurity lab on a budget. It emphasizes that practical, hands-on experience is crucial for a cybersecurity career and that creating a lab is highly achievable without significant financial investment. The core strategy involves using modest or refurbished hardware (aiming for a quad-core CPU and 16GB RAM), and leveraging free virtualization software like Oracle VirtualBox or VMware Workstation Player to run multiple operating systems on a single machine.

The article details how to set up key components, including an "attacker" machine using industry-standard OSes like Kali Linux, and "target" machines using intentionally vulnerable systems like Metasploitable and OWASP Juice Shop. It also covers building a defensive "Blue Team" capability using the all-in-one security monitoring platform Security Onion. A critical theme throughout the article is the importance of network isolation, explaining how to use virtual network modes like "Host-Only" to create a safe sandbox and prevent any risk to one's home network. The guide concludes by positioning the home lab as an invaluable, career-building tool and encourages readers to start small and incrementally grow their setup.

Leave a Reply

Your email address will not be published. Required fields are marked *